
How I Turned a Trailer Frame Into a DIY Teardrop Camper
- Bobby Hale

- 1 day ago
- 13 min read
I had wanted a teardrop camper for a while. The idea seemed simple enough: something compact and easy to tow, but still comfortable enough for a proper weekend away. I wanted a dry place to sleep, a useful kitchen at the back and enough power to keep a fridge running. Nothing especially extravagant.
Naturally, I decided the easiest way to achieve this was to design and build the whole thing myself.
Buying a completed teardrop camper would have been far quicker, but building one meant I could lay it out exactly as I wanted. With help from a friend, I designed the body, had the main plywood sections cut on a CNC router and spent the next six months turning a registered trailer frame and a large stack of timber into a finished camper.
The complete build cost roughly $6,000 AUD. It involved plenty of planning, a few avoidable mistakes and one rear hatch that became far more involved than any hatch has a right to be.
This is how it came together.
The teardrop camper build at a glance
The camper was built on an engineered and registered trailer base using 18mm lightweight plywood for the floor, walls and cabinetry. The curved roof was formed from 3mm bendable plywood, insulated with wool and then covered in aluminium. The sides were finished with blue 3mm aluminium composite panel.
Inside, the camper had a full-width queen sized sleeping area, overhead storage and basic lighting. At the rear was a large galley with a sink, storage, a portable gas cooker and space for a 40-litre fridge. A 120Ah deep-cycle battery powered the fridge, lighting and other 12V accessories.
From buying the trailer frame to completing the final fit-out, the build took about six months.
Planning the camper
Before buying the trailer or cutting any timber, I spent time working out what the camper actually needed to do.
The sleeping cabin needed to be comfortable enough for two people, but I did not want to make the body unnecessarily large or heavy. I am 6"4 so a full queen bed was important to me! At the rear, I wanted a galley that could be used as a real kitchen rather than somewhere to temporarily rest a camp stove.
The layout eventually included two side entry doors, a full-width sleeping area, overhead cabinets, underfloor storage, an onboard water tank and a large rear galley. The kitchen had a stainless steel sink, space for a 40-litre fridge, a portable gas cooker, drawers, cupboards and a pull-out work surface.
I designed the CNC files with help from a friend. The structure was planned as a series of interlocking plywood components, with slots, tabs and locating grooves helping the walls, cabinets and roof ribs fit together.
On the computer, it looked like a very organised system but that sense of organisation did not entirely survive contact with the workshop....
Step 1: Buying an engineered and registered trailer base
The first physical part of the project was buying the trailer frame.
I decided early that I did not want to fabricate the chassis myself. Building the camper body was already going to be a significant project, and adding welding, trailer engineering and first registration to the process felt like a step too far.
Instead, I purchased a trailer base that had already been engineered and registered. It came with the main running gear in place, including the suspension, axle, wheels, drawbar, coupling, safety chains, mudguards and jockey wheel.
This gave me a known and approved foundation for the build. I still had to make sure the completed camper remained within the relevant dimensions and weight limits, but it removed one of the biggest areas of uncertainty.
Looking back, it was one of the best decisions I made. There were enough challenges waiting further into the build without also wondering whether the chassis underneath it was correctly designed.

For anyone building something similar, this is also where basic trailer accessories start becoming useful. Wheel chocks, a coupling lock, levelling ramps and suitable trailer electrical connections are not the most exciting purchases, but they are the things you end up using every time the camper leaves home.
Step 2: Installing the underfloor storage and water tank
Before fitting the main floor, I installed everything that needed to sit beneath it.
This included a recessed storage compartment and the onboard water tank. The storage box sat down within the chassis rather than on top of the finished floor, which gave me extra capacity without taking space away from the sleeping cabin.
At the same time, I planned the paths for the water lines, electrical cables and flexible conduit. This was much easier while the chassis was open and accessible.
It is tempting to rush through this stage because it does not feel as though the camper is taking shape yet. In reality, it is one of the best opportunities to make the later stages easier. Once the floor, walls and cabinetry are installed, every job underneath becomes more awkward.
If I were doing it again, I would run at least one completely spare conduit from front to rear. It would cost almost nothing at this stage and could save hours if another cable or accessory needed to be added later.

When selecting a water tank for this type of camper, the available space matters just as much as the tank capacity. The tank needs enough ground clearance, secure mounting points and room around the suspension and chassis components. A slightly smaller tank that fits properly is far more useful than a large tank hanging in the wrong place.
Installing the plywood floor
Once the underfloor components were in place, I fitted the main floor.
The floor was made from 18mm lightweight plywood. I chose lightweight plywood throughout most of the build because it gave me the thickness and rigidity I wanted without adding as much weight as standard structural plywood.
The floor became the reference point for the entire camper. The walls, cabinets, internal bulkheads and roof all depended on it being square and securely fixed to the chassis.
This was one of those stages where taking extra time with measurements paid off later. Any error in the floor would have followed the build all the way to the roof.
Step 3: Cutting and assembling the CNC plywood body
The main camper structure was made from CNC-cut plywood.
The pieces included the two complete side walls, internal partitions, cabinetry, roof ribs, rear hatch ribs, shelves, drawers and structural braces. The door openings and other major cut-outs were also created on the CNC router.

Using CNC cutting made it much easier to reproduce the curved teardrop profile and build accurately fitted cabinets. It also allowed slots and locating grooves to be incorporated into the design, helping the different sections line up during assembly.
When the components were finished, they filled the back of the car. Seeing the full-sized pieces for the first time was exciting because the project finally existed as something more than drawings on a computer.

Unfortunately, we overlooked one fairly obvious task.
We did not label any of the parts.

A surprising number of plywood components look almost identical once they are stacked together. Some were mirrored, some could be installed in more than one orientation and some would fit perfectly in the wrong place until another part refused to line up.
I mixed several pieces up and fitted some around the wrong way. That created alignment issues and wasted a considerable amount of time.
If I built another camper, every component would be numbered in the design file and labelled before it came off the CNC bed. A marker and a printed parts diagram would have prevented one of the most frustrating and avoidable problems in the entire project.
Assembling the timber structure
The two full-height side walls were positioned on the plywood floor first. The internal partitions and galley cabinet panels were then fitted between them.
These internal sections were not simply storage. They also tied the side walls together, kept the body square and added strength to the structure.

The build gradually moved from the main side walls to the internal bulkheads, cabinet frames and curved roof ribs. Each piece had to be test-fitted, adjusted, glued, clamped and fixed in place.

Although the CNC joints helped locate the pieces, it was not a matter of simply slotting everything together and walking away. There was still plenty of sanding, drilling, trimming and occasionally removing a piece after realising it had been fitted incorrectly.
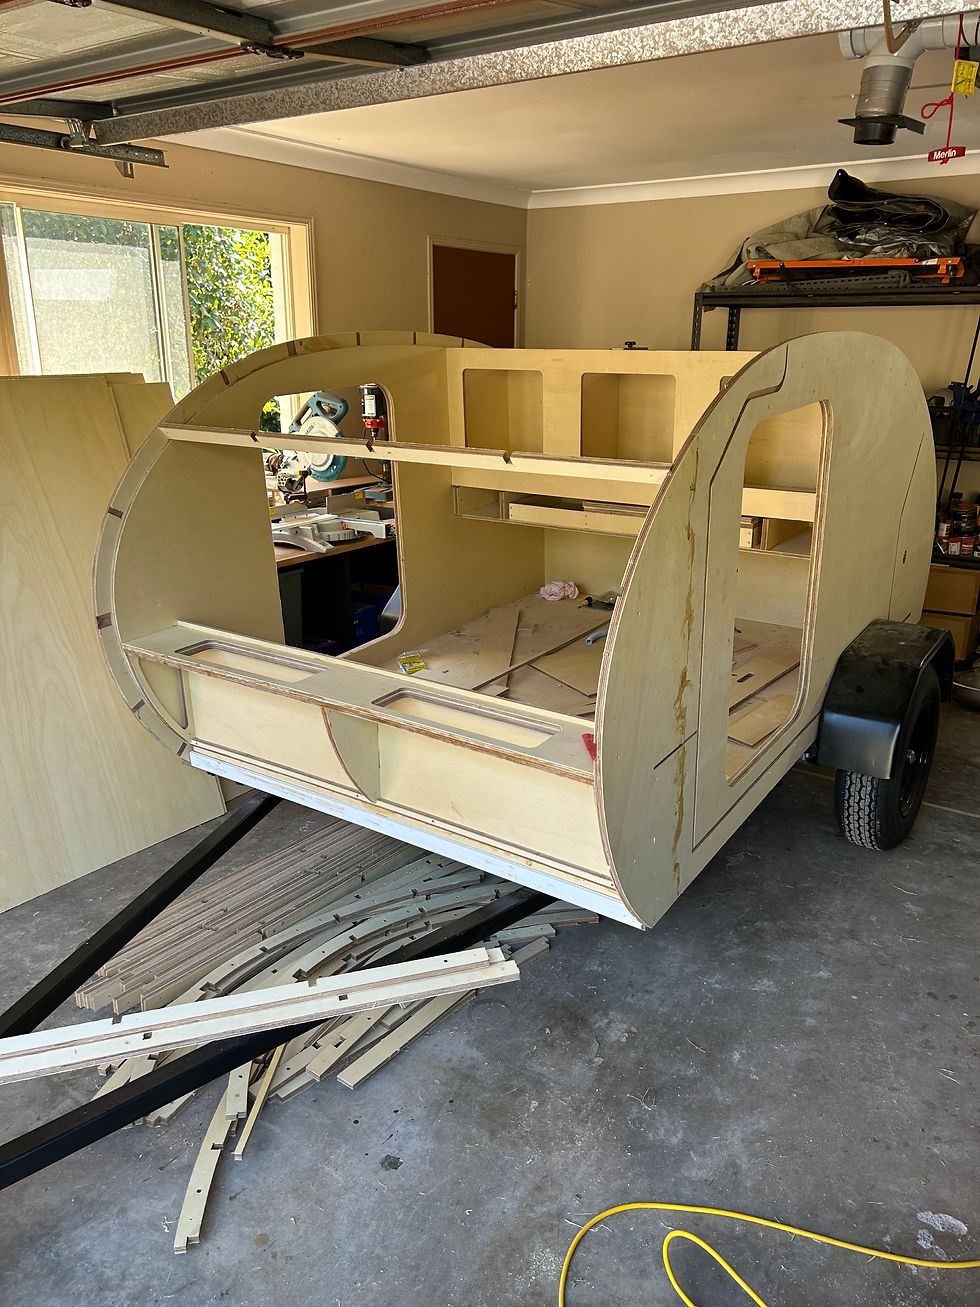
This was the point where the project began to look like a camper. Until then, it had mostly looked like a trailer carrying an elaborate plywood puzzle.
Step 4: Building the rear galley
Once the main body was standing, I began building the rear galley.
This was one of the most important areas of the design. I wanted a kitchen that was genuinely practical for a weekend away, with enough storage and bench space to prepare meals without unpacking half the car.

The finished galley included a stainless steel sink, a large central pull-out tray, lower drawers and cupboards, upper storage and dedicated space for a portable fridge and gas cooker. It also housed the electrical controls and several 12V and 240V outlets.
The cabinetry was built from the same 18mm lightweight plywood as the main structure, and because it was installed early, it also helped brace the two side walls.

Designing around the fridge
The kitchen was designed around a 40-litre portable fridge.
That size gave us enough room for food and drinks for a weekend without taking over the complete galley. However, choosing the fridge capacity is only part of the process. The actual external dimensions matter far more when designing the cabinet.
Two fridges advertised as 40 litres can be completely different shapes. The cabinet needs enough clearance for the lid, compressor ventilation, power cable, handles and hinges. It also needs to be possible to remove the fridge later without dismantling the kitchen around it.
For a new build, I would choose the exact fridge first and design the opening around the manufacturer’s dimensions.

Installing the electrical system
The camper used a 120Ah 12V deep-cycle battery to power the fridge, internal lighting and other low-voltage accessories. I also installed an inverter to provide limited 240V power where needed.
The main cables were routed through protective conduit while the body remained open. The switches, battery isolators, inverter controls and sockets were positioned in the rear galley, where they could be accessed without climbing into the sleeping cabin.
For a similar build today, a 120Ah AGM battery would be the closest match to the original setup. Lithium would reduce weight and provide more usable capacity, but it would also require compatible charging equipment and a properly designed system.
Any permanent 240V wiring should be completed and certified by a licensed electrician. There are plenty of parts of a camper build where trial and error is acceptable. Fixed mains wiring is not one of them.
Step 5: Skinning the curved roof
With the frame, cabinets and wiring mostly complete, I moved on to the curved roof.
The roof was supported by a series of CNC-cut plywood ribs fitted between the two side walls. Before closing the cavity, I installed wool insulation and completed the internal ceiling, including recessed LED lights.
The exterior roof skin was made from 3mm bendable plywood.
I had assumed a product called bendable plywood would bend fairly easily. This turned out to be an optimistic interpretation of the name.

The plywood did bend, but persuading a full sheet to follow the front curve evenly took considerably more force, patience and fixing points than expected. The tighter front section was especially difficult, and once adhesive was applied, the whole process became much more urgent.
Instead of calmly considering the next step, you are suddenly trying to control a large springy sheet of plywood while everything becomes steadily stickier.
If I did it again, I would test a full-width piece against the tightest part of the curve before finalising the roof design. I would also plan the straps, clamps and temporary fixing battens before opening the adhesive.
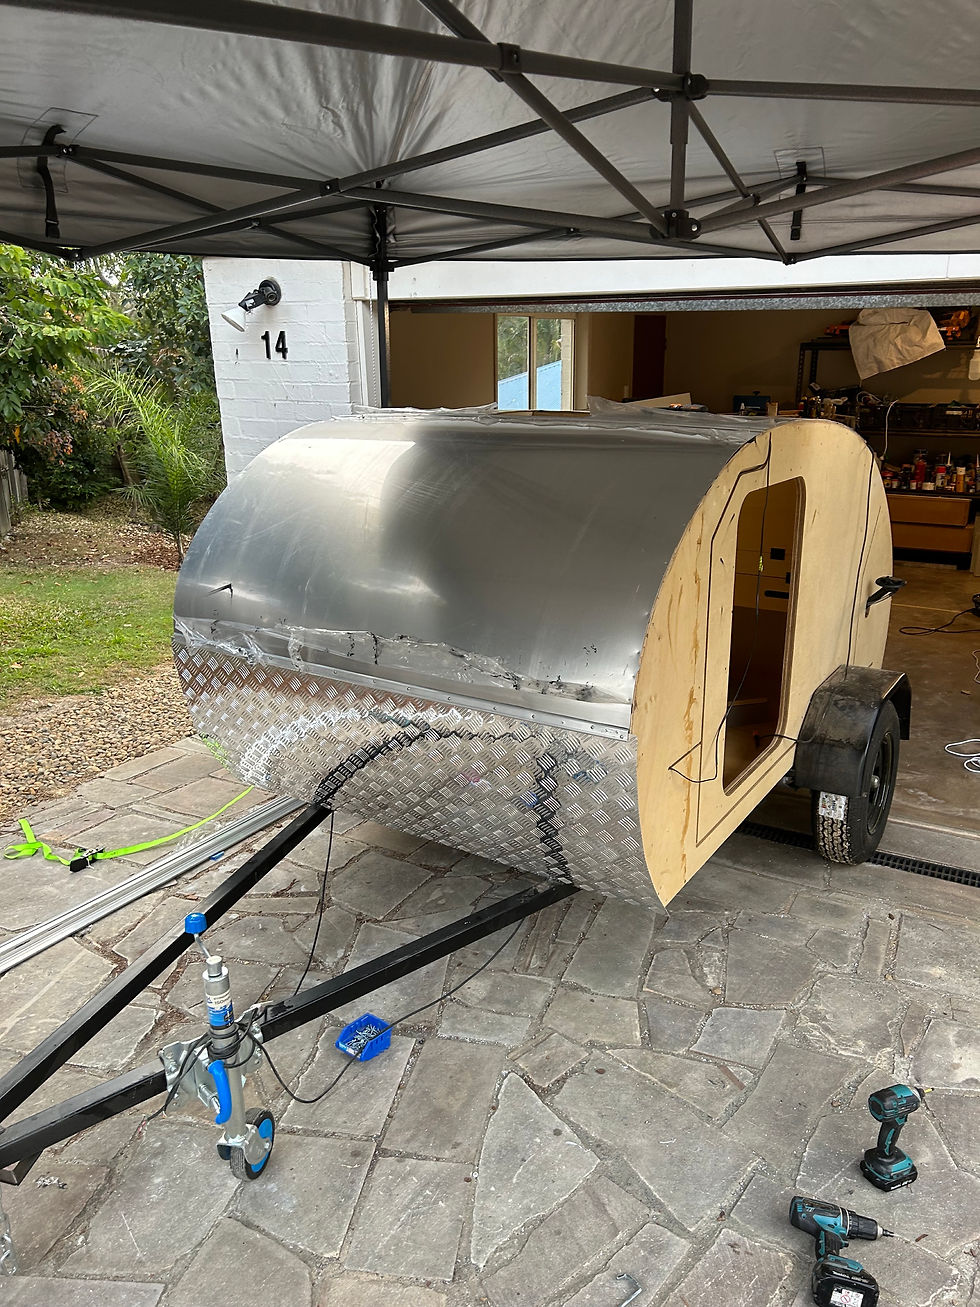
Step 6: Cladding the camper in aluminium
Once the plywood roof skin was installed, I began fitting the exterior cladding.
The side walls were covered with 3mm blue aluminium composite panel. The curved roof and rear hatch were clad in aluminium, with no separate membrane installed between the plywood roof skin and the aluminium.
Checker plate was added across the lower front to help protect the camper from stones and road debris. Aluminium edge trim was then fitted around the body to cover and protect the joins.
This was one of the most satisfying stages of the build. Up to that point, the camper still looked like a plywood prototype. Once the blue panels, aluminium roof and checker plate were installed, it suddenly looked like something that belonged at a campsite.
Sealing the exterior
I used Sikaflex automotive sealant around the exterior joins, trims, roof penetrations and other potential water-entry points.
The exterior Liquid Nails had mainly been used for structural bonding, while the Sikaflex was used in places where flexibility, vibration and weather exposure were more important.
It is worth remembering that not every adhesive or sealant is compatible with every camper material. Aluminium composite panel, painted aluminium, plastics, acrylic and rubber seals can all require different products or surface preparation.
Building the rear galley hatch
The rear hatch was easily the most frustrating part of the build.
It was made from curved CNC-cut ribs designed to follow the back profile of the camper. The frame was skinned, clad in aluminium and finished with checker plate across the lower section.
Building the shape was manageable. Making it reliably waterproof was not.
The hatch needed to sit evenly against a large curved opening, compress the seal consistently and direct water away from the hinge and sides. Even a small low point or uneven section gave water somewhere to collect or enter.
I spent a great deal of time adjusting the fit, changing seals and trying to identify exactly where the leaks were coming from. Water has a remarkable ability to ignore all the areas you sealed carefully and find the one gap you missed.
If I designed another teardrop camper, I would treat the hatch as a complete water-management system from the start. The hinge, overlap, gutter, drip edge, seal profile, latches and drainage path would all be designed together before any plywood was cut.
I would also test the hatch with water much earlier in the build. By the time the cladding and trim were finished, every adjustment became more difficult.
The hatch eventually worked, but it demanded far more time and patience than I had allowed for. It was the part of the build most likely to make buying a finished camper suddenly seem like a very sensible idea.
Step 7: Installing the doors and roof vent
The final major construction stage was installing the doors and roof vent.
I used prefabricated camper doors rather than attempting to make weatherproof doors myself. By that stage, the rear hatch had already provided more than enough waterproofing experience.
The doors came with their frames, latches and integrated flyscreens. They fitted into the CNC-cut openings in the side walls and were sealed around the perimeter.
Using complete camper doors saved a great deal of work and gave the finished trailer a much cleaner result.

The roof vent was fitted above the sleeping area to help remove heat and moisture. Ventilation is especially important in a small camper, where two people sleeping inside can create a surprising amount of warmth and condensation.
For a similar build today, I would look at a roof vent with an integrated 12V fan. Caravan RV Camping currently offers options such as the Coast RV 14 x 14 black roof vent, which would also suit the black doors and other fittings used on this camper.
Before choosing a roof vent, it is important to check the cut-out dimensions, roof thickness, garnish depth, electrical requirements and position of the roof ribs.
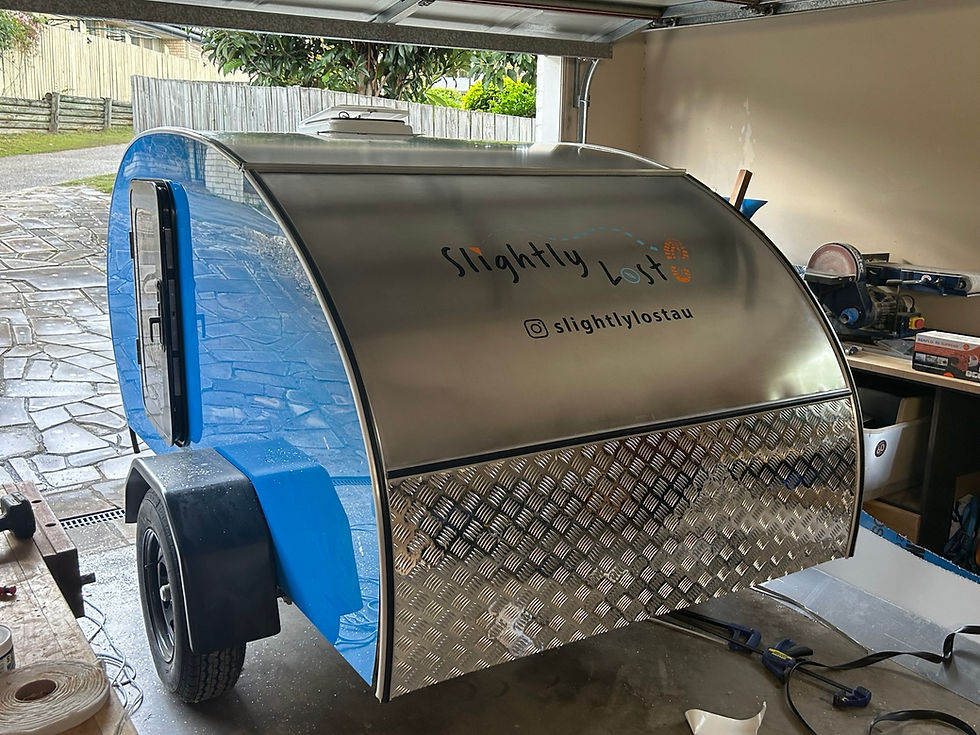
The finished teardrop camper
After about six months of designing, cutting, assembling, wiring, cladding and sealing, the camper was finally complete.
The finished build had an engineered and registered trailer base, underfloor storage, an onboard water tank, an 18mm lightweight plywood body, wool roof insulation, aluminium composite sides, an aluminium roof and rear hatch, two screened doors and a full rear galley.

It also included a 40-litre fridge, a portable gas cooker and a 120Ah deep-cycle battery.
The total cost came to roughly $6,000 AUD. That was what this particular build cost at the time, rather than a current estimate for building an identical camper today. Trailer frames, plywood, fridges, batteries and almost every other component have changed in price since then.
What I would do differently
If I built another teardrop camper, the first change would be painfully simple: every CNC component would be labelled. It would take only a few minutes while the parts were being cut and would prevent hours of confusion during assembly.
I would also test the bendable plywood before committing to the final roof curve. The material eventually worked, but the tighter bend was much harder to achieve than expected. Knowing that earlier would have allowed me to adjust the design or prepare a better clamping system.
Most importantly, I would spend much more time designing the rear hatch around waterproofing. On this camper, the shape came first and water management was solved later. Next time, the seals, hinge, gutter, overlap and drainage path would be fundamental parts of the design from the beginning.
Was building a teardrop camper worth it?
For me, building the camper was worth it, although it was certainly not the quickest or easiest way to get one.
There were plenty of moments during the six-month build when buying a finished camper started to look like an excellent idea. Progress could be slow, particularly when a part had been fitted incorrectly or the rear hatch developed another leak.
The finished camper, however, was built around exactly how I wanted to travel. It was compact and easy to tow, while still having a comfortable sleeping area and a kitchen that was far more practical than its size suggested.
I also learned an enormous amount during the process. Some lessons came from the design and construction itself, while others came from discovering that bendable plywood does not always want to bend, unlabelled CNC parts quickly become indistinguishable and water will find almost any weakness in a hatch.
That is part of building something yourself. You plan as carefully as you can, make a few mistakes, solve problems you never expected and eventually end up with something that did not exist before.
The result was slightly imperfect, completely custom and ready to get a little lost.
Frequently asked questions
How much did it cost to build the teardrop camper?
The camper cost approximately $6,000 AUD. This included the engineered and registered trailer base, plywood structure, CNC cutting, exterior cladding, galley, doors, fridge and electrical system.
How long did the build take?
The complete build took around six months working about 1 day most weekends and some time after work.
Did you build the trailer chassis?
No. I purchased an engineered and registered trailer base and built the teardrop body on top of it.
What plywood was used?
The floor, walls and cabinetry were made from 18mm lightweight plywood. The curved roof skin was made from 3mm bendable plywood.
Was the teardrop camper insulated?
Yes. Wool insulation was fitted in the roof cavity before the interior and exterior roof skins were completed.
What was used on the exterior?
The sides were covered with 3mm aluminium composite panel. The curved roof and rear hatch were clad in aluminium, with checker plate protecting the lower front.
What battery did the camper use?
The camper used a 120Ah 12V deep-cycle battery.
What size fridge fitted in the galley?
The rear galley was designed around a 40-litre portable camping fridge.
What was the hardest part of the build?
Making the rear galley hatch waterproof was the hardest part. Forming the flexible plywood roof and identifying the unlabelled CNC-cut components also created problems.
Can a teardrop camper be built without CNC cutting?
Yes. The components could be made using templates, a router and a jigsaw. CNC cutting made the curves, cabinetry and locating joints more accurate, but it is not essential.


Comments